Tensile testing machine
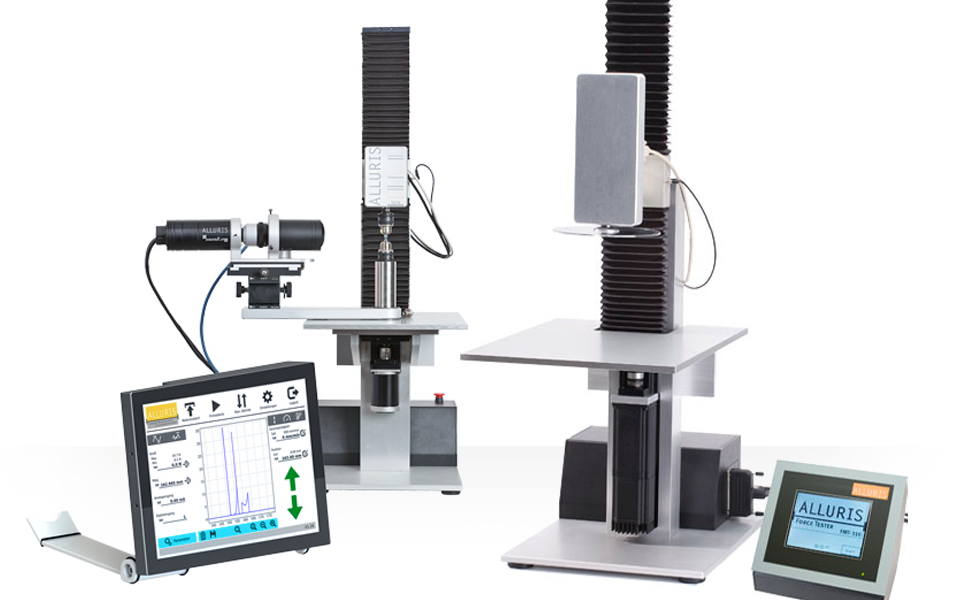
Tensile or universal testing machines (UTM's) are used to determine physical (mechanical) material properties and to perform material/component testing. The two main parameters are force and length, as a change of dimension (length) as force is applied.
Further measured variables (for example temperature) can be recorded and been related to force and / or length. In addition to the determination of material properties, tensile testing machines are also widely used for design validation and quality assurance of workpieces, assemblies or entire products.

Engineered for precision, durability and ease of use
Alluris universal testing machines (UTMs) are engineered to accurately measure the mechanical properties of materials, components, and assemblies through tensile and compression testing.
Our instruments are a perfect combination of precision and durability, with robust construction and user-friendly testing software, ensuring that you get accurate results every time.
Whether you're conducting routine quality control checks or performing advanced material analysis, Alluris UTMs are a valuable tool for any laboratory or manufacturing setting.
Typical applications
Tensile strength (yield strength)
The most common and perhaps one of the first applications of tensile testing machines is to determine the tensile strength of materials. Today, the term tensile testing machine and universal testing machine is often used interchangeably.
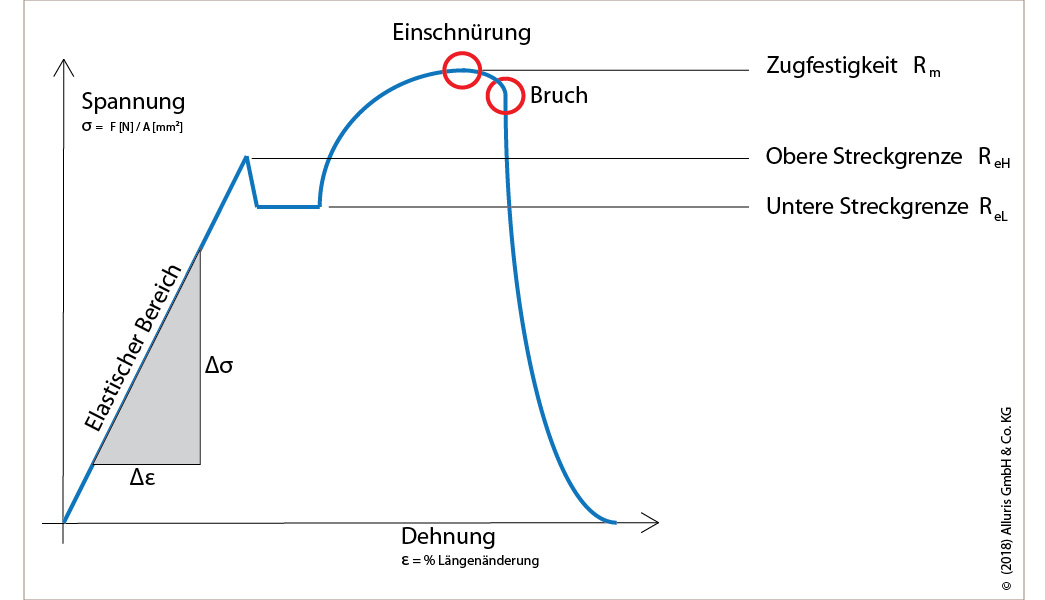
The tensile strength as material property, describes the maximum mechanical tensile stress, as force related to the cross-section. The unit of measurement for this is N / mm² (Newton per square millimeter) or MPa (MegaPascal). Simplified, in some cases only the maximum tensile force without reference to the cross-section is indicated, provided the samples are comparable or comparative measurements are made.

The associated test standards of material testing are usually designed for different material groups. (e.g., DIN EN ISO 6892-1 for metallic materials). Internationally harmonized standards for steel often use the term yield strength instead of tensile strength.
Compression and breaking strength
In addition to the tensile strength, the compression or breaking strength is used to describe material properties. This becomes valid for materials whose specimens can not be pulled (e.g., pellets or tablets) or break sensitive components (e.g., glass panes or solar cells). Correctly, this type of machine should be decribed as an uniaxial pressure and tensile testing machine. Destructive bending tests are also used to test thermoplastic or reinforced plastic according to DIN EN ISO 178 (3-point bending test) or DIN EN ISO 14125 (4-point bending test).
The shear strength of two interconnected materials, e.g. electronic components soldered to printed circuit boards are tested by a continuous increase in force until the connection breaks.
Force / distance test (spring test)
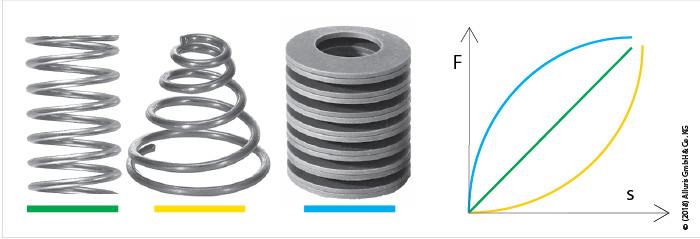
During the force / displacement test with a tensile testing machine, the force and distance measured values are recorded synchronously and graphically displayed as a diagram. In addition to the classic (compression or tension) spring test with linear characteristic curves and the determination of the spring constant, nonlinear curves with hysteresis are also recorded. With the aid of the force-displacement curves typical of buttons and switches, haptic sensory perceptions can be objectified and acceptance criteria for electromechanical components can be defined.

While capturing force and displacment digtal outputs (e.g. of switches) or analog outputs are also detected. Values and electromechanical components (for example electromagnetic valves) are activated during the test.
Holding force - adhesive force - frictional force
Another application of a tensile tester is the determination of the holding or adhesive force and the frictional force of fasteners, glues etc. in a variety of applications. The desired mechanical function of these elements is essentially determined by the size of force. Detecting the adhesion force with tensile testing machines, the measured force is referred to either the area (e.g., the adhesive force of a magnet in N / mm²) or a line (e.g., N / 10mm), such as the adhesive force of adhesive tapes. In this context, the term peel test is often used.
To determine the static friction and sliding friction, the coefficients of friction F (RH) and F (RG), a corresponding device is mounted on the base traverse of the tensile tester and pulled a standardized to DIN 53375 or ISO 8295 edition over the surface to be tested.
Elasticity and plasticity
In bending and tensile tests, force-displacement diagrams are recorded in pull and push directions in order to determine the relation between plastic and elastic deformation, based of the hysteresis behavior of the material or the component. In contrast to the classical bending or tensile test, the material or the assembly is not loaded up to the yield strength but the force is reduced again beforehand. Changes in the eleastic behavior are performed on tensile testing machines as a continuous test with repetitive cycles.
Stickiness and consistency
In addition to the adhesive strength of glues or adhesive tapes, the determination of tack in processing operations can play an important role. By virtue of the tackiness of prepregs (preimpregnated fibers or fabrics for lightweight CFRP / GFRP components), e.g. determine which parameters need to be changed in a follow-up process and whether long-stored material can still be processed at all.
In the food industry, the sensory properties of a product influence the purchasing behavior of customers. Here stickiness, consistency and other "mouthfeelings" are summarized under the keyword texture. With the aid of the force-displacement measurement, these properties are tested under standardized conditions, whereby in the majority of cases not absolute characteristic values are evaluated as a criterion, but comparative measurements take place. Therefore, the accuracy and resolution of the distance measurement plays in these systems mostly a minor role. Tensile testing machines in these applications are also referred to as texture analyzers.
Construction overview
Load frame
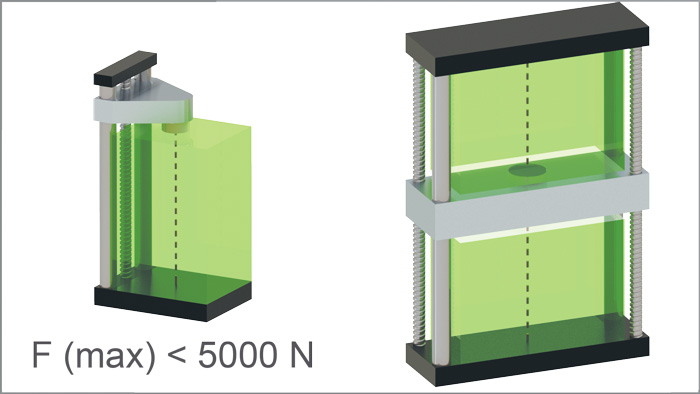
Classic tensile testing machines consist of an open or closed load frame, in which a moving crosshead with a spindle can be driven up and down. The load frame can be designed as a 1-column or 2-column construction. The 1-column machines with open load frames have the advantage of the test area accessible from three sides, but are i.d.R. built only for power ranges up to 5000 N, since the deformation of the frame at higher forces has a negative effect on the force measurement.

The spindles (ball screws or trapezoidal spindel) for raising and lowering the crosshead are driven by an electric motor, with high loads also hydraulic drives are used. Decisive for the choice of the drive is the requirement for an exact speed control, independently of the load or sudden force changes.
Working space
The size of the working space is determined by the overall design of the machine. While the area for 1-column tensile testing machines is usually limited to the rear and remains open to the side and to the front, the two lateral columns limit the test area to both sides. The distance between the two guides on 2-column tensile testing machines also depends on the force range.
Load Cell / Force Sensor
For force measurement, almost exclusively transducers based on strain gauges are used, since they have a high measuring accuracy with low drift even with static and quasistatic forces. The classification of tensile testing machines and universal testing machines with regard to the force measurement is generally carried out in accordance with DIN EN ISO 7500, with Class 1 covering most of the relevant test standards. The more accurate class 0.5 is state of the art today. The calibration of tensile testing machines is carried out according to the same standard at the place of installation with force transmission standards of the same or higher class, which in turn are calibrated according to DIN EN ISO 376.
The load cell is usually attached to the movable crossbar, but it can also be mounted on one of the fixed crossbars. Less common in tensil testing machines are two force transducers for the use of two test chambers above and below the moveable crosshead without changing the force transducer. Multi-axis force transducers in special designs can also detect lateral forces or bending moments in addition to the main force axis.sducers and the fixed traverses of the tensile testing machine are equipped with threaded connections or shaft ends with cross-hole to adapt sample holders. With rotationally symmetrical force introduction parts or sample holders it is possible to adapt to a thread. If both sides must be referenced against each other for the correct clamping of the sample, it is advisable to adapt it with a cross-shaped pin.
Specimen holders and force introduction parts
In order to achieve the lowest possible measuring errors and a good reproducibility of measurement results during material testing, the correct introduction of force is of decisive importance. Even slight deviations from the force measuring axis or transverse forces can lead to measurement errors which far exceed the specified measurement uncertainty of the tensile testing machine. The specimen holders therefore make a significant contribution to the overall measurement uncertainty. Many test standards refer directly or in the appendix to constructive properties of specimen holders and force introduction parts.
Both the force transducers and the fixed crossbars of the tensile testing machine are equipped with threaded connections or shaft ends with cross-hole to adapt sample holders. With rotationally symmetrical force introduction parts or sample holders it is possible to adapt to a thread. If both sides must be referenced against each other for the correct clamping of the sample, it is advisable to adapt it with a cross-shaped pin.
Safety devices for tensile testing machine
In addition to the 2006/42EG Machinery Directive and the related standards derived from it, the product standard DIN 51233 is used for the safety-related specifications for universal testing machines. The need for safety equipment depends on the range of application and must be taken into account when using the testing machine. During commissioning, a risk analysis should therefore be carried out to determine whether special precautions are necessary to protect the operator of the installation.
Metrological requirements
Force measurement
The classification of the force measuring device is based on DIN EN ISO 7500 or ASTM E4. Since tensile testing machines are designed for static and quasistatic force measurement, almost exclusively strain gauge-based force transducers are used which, in contrast to piezoelectric force transducers, have a significantly lower load drift. The correct introduction of force and the correct sample take-up in practice determine the measuring accuracy more strongly than the measured value deviation and resolution of the force transducers.
Distance and length measurement
To control the machine the current position of the crosshead is recorded. Linear position transducer or the spindle rotation is captured. With high-precision ballscrew drives and known deformation of the frame under load, measurement data for the length measurement can be derived indirectly from this.
Instead of the indirect method, the deformation of the sample can also be measured by extensometers directly on the test object. These transducers are connected directly to the sample or the sample is optically measured. Extensonmeters can detect very small deformations, but if necessary affect the result of the force measurement at very low forces.
The classification of the measuring device for the length on a tensile testing machine is carried out according to DIN EN ISO 9513.
Calibration / Tracebility
Both the force measuring device and the extensometer of a tensile testing machine must be routinely traced back to the force and length standards of a National Metrological Institute (NMI), in Germany this is the Physikalisch Technische Bundesanstalt (PTB). The corresponding standards for carrying out the calibration are always based on an on-site calibration, which usually takes place during the annual maintenance intervals.
As of September 2018, all automobil suppliers with IATF16949:2016 quality standard should have calibration certificates bearing the DAkkS or ILAC logo, accordingly, be produced by an accredited calibration laboratory. (Link: Accredited Cal Certs |FAQ's)
Further measuring inputs
Tensile testing machines used to test functional assemblies or electromechanical machine elements require additional measurement inputs to detect the state changes of the test objects in time synchronism with the force-displacement data. These can be simple switching inputs or standardized signal inputs.

Request a demonstration
Our technical sales engineers can provide demonstrations of our test equipment either online or at your site - let us help you find the best testing solution for your requirements.
Get in touch to discuss your requirements and arrange a demo or training session.
Normative References
Standards for tensile testing machines, material testing machines or universal testing machine
Maschinenrichtlinie 2006/42/EG (kostenfrei zu beziehen bei: EUR-Lex)
DIN 51220 Werkstoffprüfmaschinen - Allgemeines zu Anforderungen an Werkstoffprüfmaschinen und zu deren Prüfung und Kalibrierung (zu beziehen bei: Beuth Verlag AG)
DIN 51233 Werkstoffprüfmaschinen - Sicherheitstechnische Festlegungen (zu beziehen bei: Beuth Verlag AG)
DIN EN ISO 7500 Kalibrierung und Überprüfung von statischen einachsigen Prüfmaschinen - Teil 1: Zug- und Druckprüfmaschinen - Kalibrierung und Überprüfung der Kraftmesseinrichtung (zu beziehen bei: Beuth Verlag AG)
ASTM E-4 - Standard Practices for Force Verificaton of Testing Maschines (zu beziehen bei: ASTM International)
DIN EN ISO 9513 - Kalibrierung von Längenänderungs-Messeinrichtungen für die Prüfung mit einachsiger Beanspruchung (zu beziehen bei: Beuth Verlag AG)
DIN EN ISO 376 - Metallische Werkstoffe - Kalibrierung der Kraftmessgeräte für die Prüfung von Prüfmaschinen mit einachsiger Beanspruchung (zu beziehen bei: Beuth Verlag AG)
Testing standards relating to tensile testing machines, material testing machines or universal testing machines
DIN EN ISO 6892-1:2016-06 Metallische Werkstoffe - Zugversuch - Teil 1: Prüfverfahren bei Raumtemperatur (zu beziehen bei: Beuth Verlag AG)
DIN EN ISO 178 - Kunststoffe - Bestimmung der Biegeeigenschaften (zu beziehen bei: Beuth Verlag AG)
DIN EN ISO 14125 - Faserverstärkte Kunststoffe - Bestimmung der Biegeeigenschaften (zu beziehen bei: Beuth Verlag AG)
DIN 53375 - Prüfung von Kunststoff-Folien (Norm zurückgezogen, Alternativ DIN 8295)
DIN EN ISO 8295 - Kunststoffe - Folien und Bahnen - Bestimmung der Reibungskoeffizienten (zu beziehen bei: Beuth Verlag AG)